


Toilets are one of the most essential fixtures in any home, but when something goes wrong, such as a leaking toilet, it’s not always obvious what the issue is—until you start seeing leaks or smelling something unpleasant. One of the most common causes? A worn or damaged toilet outlet seal.
If you’re dealing with persistent bathroom odours or water pooling around the base of your toilet, it may be time to replace the new seal on a toilet outlet pipe, which connects to the toilet tank . This guide will walk you through how to replace seal on toilet outlet pipe and everything else you need to know to carry out the job in your Australian home—safely, efficiently, and with minimal fuss.
Why the Toilet Outlet Seal Matters
The outlet seal—also known as the toilet pan seal, pan collar seal or pan connector seal—is the crucial component that forms a watertight barrier between the toilet pan connectors and the waste pipe. It prevents wastewater and sewer gases from leaking into your bathroom, keeping your space clean, hygienic, and odour-free.
Over time, these seals can degrade due to age, cleaning chemicals, or repeated toilet movements. If you’re noticing persistent odours near the toilet, damp patches at the base of the pan, or even visible water leaks, in most cases, it’s likely your worn out rubber seal needs replacing to prevent a leaky toilet. Catching the problem early can save you from more serious water damage and health hazards down the track.
Common Types of Toilet Seals in Australian Bathrooms
In Australian homes, several types of toilet outlet seals are commonly used, and the right one can depend on the age of your toilet, the plumbing configuration, and even the brand. Knowing the differences between rubber seal and these seal types can help you choose the correct replacement for your toilet base. and avoid unnecessary issues down the track.
Rubber Seals
Rubber seals are the most common in modern Australian toilets. They’re flexible, durable, and provide a reliable watertight seal. Easy to install, they slide into place at the toilet tank and create a seal with the toilet bowl. nd handle minor movement well. Most new toilet pans include one, and they’re easy to find at stores like Bunnings.
Foam Seals
Foam seals are common in older or budget toilets. They compress to form a seal but can break down over time. While still available, many Aussies upgrade to rubber or waxless seals to prevent toilet leaks for longer-lasting results.
Waxless Seals (PVC or Silicone-Based)
Waxless seals are popular in new Aussie homes and renovations. Made from durable plastic or silicone, they resist wear and are cleaner to install than wax rings, especially when replacing the water supply line . Some are reusable, making them a low-maintenance, long-term choice.
Choosing the Right Seal for Your Toilet
Most modern Aussie toilets use rubber or waxless seals for their reliability and easy installation. Older toilets may still have foam seals, but many homeowners are opting for a new wax ring . Always check your existing seal before buying a replacement—bringing the old one or a photo to the hardware store can help you find the right match.
Tools and Materials You’ll Likely Need
Most Aussie DIYers will already have a few of these in their toolkit, but here’s a comprehensive list:
Basic tools:
- Adjustable spanner or wrench
- Flathead screwdriver
- Bucket and sponge or towels
- Rubber gloves
- Cleaning rags
Additional helpful tools:
- A putty knife or scraper (to remove old seal residue)
- WD-40 or penetrating oil (for stuck bolts)
- Spirit level (to ensure the toilet is even)
- Silicone sealant (if recommended by the manufacturer)
- Replacement seal compatible with your toilet model
Having the right tools, including paper towels, will make the job quicker and help avoid any damage to the toilet or flooring.
Steps to Prepare the Area
Before you dive into removing the toilet, you’ll want to ensure the area is safe and ready for work.
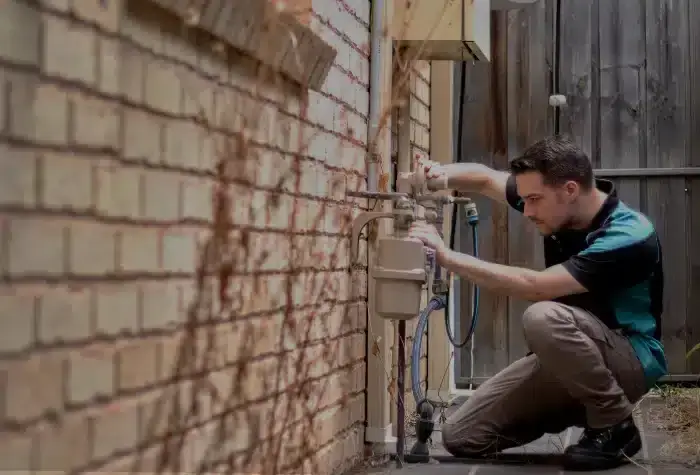
- Turn off the water supply to the toilet. Most Australian toilets have an isolation valve located near the cistern—simply turn it clockwise to shut off the flow.
- Flush the toilet to drain as much water as possible from the cistern and bowl.
- Use a sponge or towel to soak up any remaining water inside the bowl and cistern.
- Remove nearby items like mats, toiletries, or any decorative pieces around the toilet. This gives you a clean workspace and reduces the risk of damage or contamination.
How to Remove the Toilet to Access the Seal
Now that your area is prepped, it’s time to disconnect and lift the toilet to access the outlet seal.
- Disconnect the water inlet hose from the cistern using a spanner.
- Unscrew the bolts at the base of the toilet. These may be covered with decorative caps—gently pry them off with a screwdriver.
- If the toilet is silicone-sealed to the floor, carefully run a utility knife around the base to break the seal.
- Rock the toilet gently side to side to loosen the pan from the outlet. Once free, lift the toilet carefully and place it on an old towel or cardboard to avoid scratching the floor.
Tip: Toilets are heavier than they look. If it’s a one-piece model or you’re working alone, consider getting someone to help lift it safely.
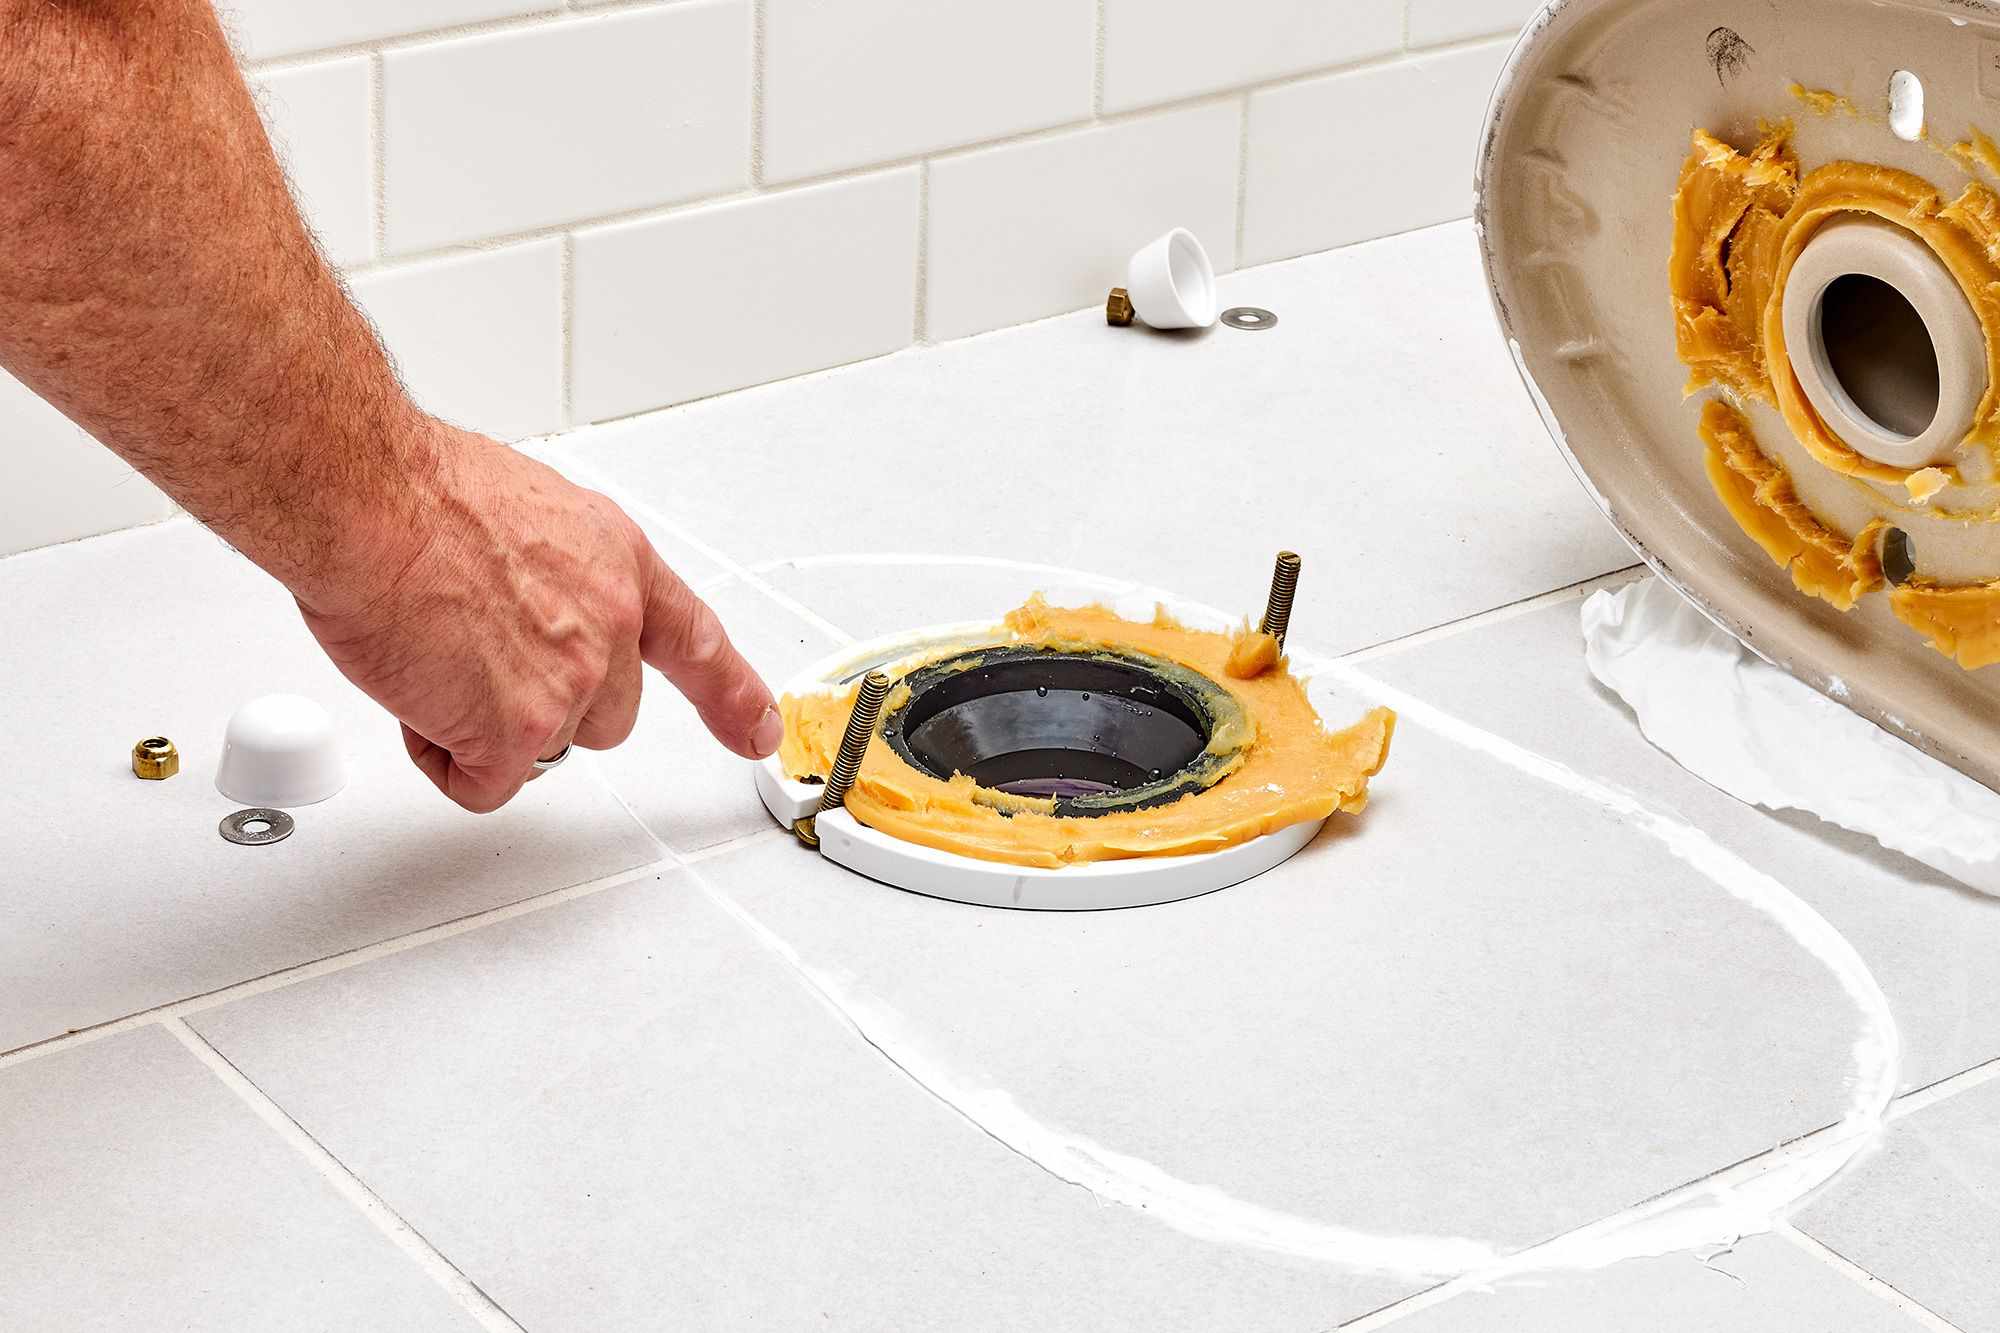
Replacing the Outlet Seal
With the toilet removed, you can now get to the business end of the job.
- Remove the old seal from the waste pipe or the toilet outlet. You may need to pry it off gently if it’s stuck or deteriorated.
- Clean the area thoroughly using a cloth or scraper. Make sure there’s no debris or remnants of the old seal, as this could prevent a proper fit.
- Inspect the pipe connection for any cracks or damage.
- Install the new seal by following the manufacturer’s instructions. It should slide securely over the outlet or into the pipe opening, depending on the type.
- Apply silicone sealant if the manufacturer recommends it, especially around the base of the pipe connection for added security.
Reinstalling the Toilet and Testing for Leaks
Now it’s time to put everything back together and make sure it’s in proper functioning order as it should.
- Carefully lower the toilet back into position, ensuring it aligns with the outlet pipe and bolts.
- Press down firmly to engage the seal, then reattach the bolts and tighten them evenly. Avoid over-tightening as it may crack the porcelain.
- Reconnect the water inlet hose, and turn the valve back on slowly.
- Check for any leaks around the connection. Flush the toilet a few times and watch for any movement or seepage.
- Seal around the base with silicone if necessary, then allow it to cure as per the instructions.
When to Call a Licensed Plumber in Australia
While many handy Aussies feel confident tackling this kind of repair, there are situations when it’s better to call in the professionals. If you notice cracks in the toilet or toilet cistern or outlet pipe,, persistent leaks even after replacing the tank lid seal, or if you’re dealing with complicated or unusual toilet setups, it’s a good idea to seek expert help.
Additionally, if you’re unsure about local plumbing codes or feel uncertain about the job, calling a licensed plumber is the safest option. In many Australian states, plumbing work that involves modifying pipework or installing fixtures must be carried out by a professional to comply with local regulations and ensure your home insurance remains valid.
Frequently Asked Questions (FAQs)
How to replace a seal on a toilet outlet pipe in Australia?
Follow the process of isolating the water, removing the toilet, swapping out the seal, and reinstalling the unit. Ensure you’re using a seal type that matches your toilet model and pipe connection.
How do you reseal a toilet waste pipe?
You reseal a toilet waste pipe by removing the old seal, cleaning the surfaces, and installing a new rubber or waxless seal, ensuring that no excess water leaks between the drainage pipe and toilet pan and waste outlet.
How to replace a toilet inlet seal?
The inlet seal is typically located at the connection between the cistern and the bowl. To replace it, turn off the water, remove the tank (cistern), and swap the seal before reassembling and testing for leaks.
How to replace a rubber seal at the back of a toilet?
This often refers to the pan connector seal. After the removal of the toilet, take out the old rubber seal and insert a new one—ensuring a snug fit to avoid any loose connections . Clean the surfaces before resealing to prevent future leaks.


Loading...